概要 †
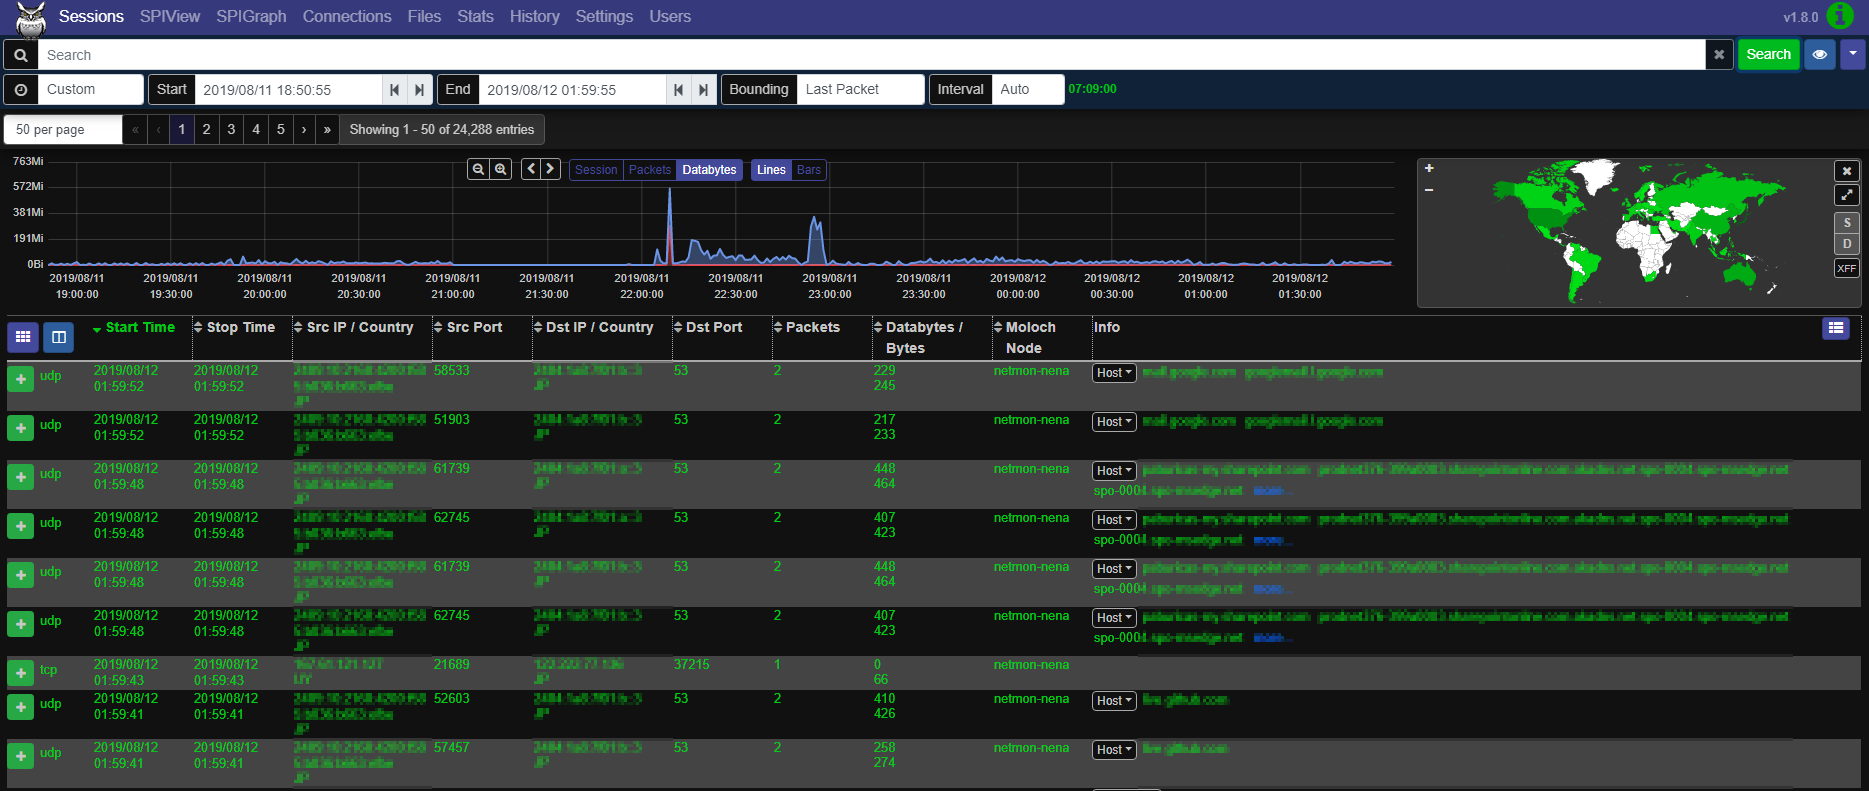
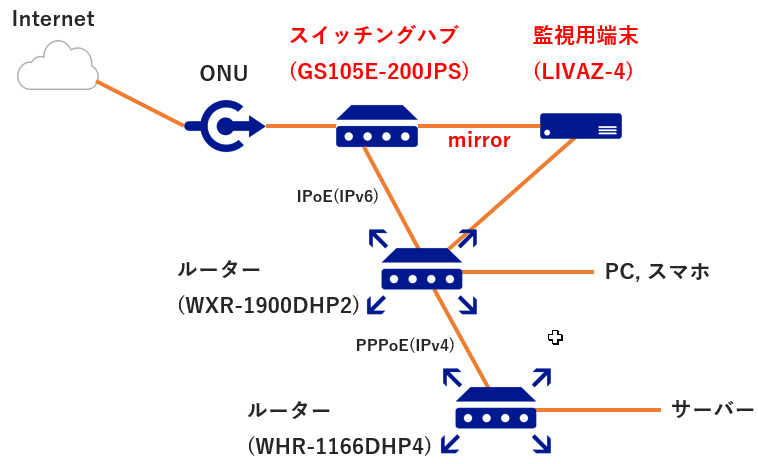
常時ネットワークモニターのMolochを導入し、インターネット-LAN間のIN/OUTをモニターします。
1端末にMoloch, Elasticsearchを同居させましたが、個人宅の通信量では問題なくモニター可能でした。
構成 †
本構成には関係ありませんが、図のルーター構成が気になる場合は以下を参照してください。
ネットワーク/IPoE, PPPoE接続を併用する
※現在はinterlinkがtransix網+固定IPv4サービスを開始したため、下記の構成に移行しました。
こちらの構成でもmolochの運用に変わりはありません。
ネットワーク/IPoE+DS-Lite,IPIP,PPPoEを併用する
スペック †
LIVA Z-4
| CPU | Intel(R) Pentium(R) N4200 |
| MEM | DDR3L 4GB |
| Disk | eMMC 32GB |
| HD-LB2.0TU3/N 2TB(USB3.0)(pcap, elasticsearchデータ格納先) |
| NIC | 1000BASE-T x2 |
手順(スイッチングハブ) †
- 適当なPCをスイッチにつなげる
- そのPCを固定IP化する
192.168.0.210/24
- ブラウザで[http://192.168.0.239]にアクセスする
- パスワードを入力(デフォルト:password)
- [システム]-[モニタリング]-[ミラーリング]
- ミラーリングを[有効]にし、srcポートとdstポートを選択
- [適用]
手順(OS) †
- Ubuntu 18.04 LTSをLIVA Z-4にインストール
最小構成でインストール
- 最新化
  1
  2
  3
  4
  5
|
-
!
| apt update && apt upgrade
apt autoremove
|
- bash/My設定
- Vim/My設定
- SSH/チートシート
- sysctl/チートシート (念のため通常設定するnet.*系の設定はフォワード禁止以外未設定)
- タイムゾーン変更
1
|
| dpkg-reconfigure tzdata
|
- ネットワーク
- ブート時のオンライン待ちスキップ
  1
  2
|
| systemctl disable systemd-networkd-wait-online
systemctl mask systemd-networkd-wait-online
|
- if1つを固定IP化(ミラーポート出ないほうに接続する側を固定IPにする, 以下の例ではenp1s0がミラーポート)
vi /etc/netplan/50-cloud-init.yaml
  1
  2
  3
  4
  5
  6
  7
  8
  9
 10
 11
|
| network:
ethernets:
enp1s0:
dhcp4: true
enp3s0:
addresses: [<固定IP(e.g. 192.168.10.100/24)>]
gateway4: <デフォルトゲートウェイIP(e.g. 192.168.1.1)>
nameservers:
addresses: [<DNS IP(e.g. 192.168.1.1)>]
dhcp4: false
version: 2
|
- 反映
- USBドライブ
- 初期化
  1
  2
  3
  4
  5
|
| fdisk /dev/sda
d
n
w
mkfs.ext4 /dev/sda1
|
- 起動時マウント, マウントオプション設定
vi /etc/fstab
1
|
| /dev/sda1 /mnt/usb ext4 defaults,relatime 0 2
|
- OS再起動
手順(Elasticsearch, Moloch) †
※下記手順ではmoloch(pcap), elasticsearch(SPI)の保存先を同一ディスクにしていますが、分けた方が運用面で安全です。
分けない場合は下記手順のように、moloch側の閾値を変更しelasticsearchがread only modeにならないようにする必要があります。
(閾値:moloch:95%(超えた場合古いpcap削除), elasticsearch:95%(超えた場合read only mode, 戻すにはディスクを空けREST APIを叩く) )
- Elasticsearchインストール
- インストール
  1
  2
  3
  4
  5
|
| apt install openjdk-8-jdk
wget -qO - https://artifacts.elastic.co/GPG-KEY-elasticsearch | apt-key add -
apt install apt-transport-https
echo "deb https://artifacts.elastic.co/packages/6.x/apt stable main" | tee -a /etc/apt/sources.list.d/elastic-6.x.list
apt update && apt install elasticsearch
|
- JVM設定
vi /etc/elasticsearch/jvm.options
- Elasticsearch設定
vi /etc/elasticsearch/elasticsearch.yml
  1
  2
  3
|
| cluster.name: moloch
path.data: /mnt/usb/elasticsearch
network.host: 127.0.0.1
|
- 追加設定, 再起動
  1
  2
  3
4
|
| mkdir /mnt/usb/elasticsearch
chown elasticsearch:elasticsearch /mnt/usb/elasticsearch
systemctl restart elasticsearch
systemctl enable elasticsearch
|
- Molochインストール
- インストール
1
2
|
| curl -L -O https://files.molo.ch/builds/ubuntu-18.04/moloch_1.8.0-1_amd64.deb
apt install ./moloch_1.8.0-1_amd64.deb
|
- 初期化1
/data/moloch/bin/Configure
  1
  2
  3
  4
5
6
7
8
9
10
|
-
|
|
|
|
|
|
|
|
| Found interfaces: enp1s0;enp3s0;lo;wlp2s0
Semicolon ';' seperated list of interfaces to monitor [eth1] <モニターするif(e.g. enp1s0)>
Install Elasticsearch server locally for demo, must have at least 3G of memory, NOT recommended for production use (yes or no) [no] <そのままEnter>
Elasticsearch server URL [http://localhost:9200] <そのままEnter>
Password to encrypt S2S and other things [no-default] <任意のパスワードシークレット>
Moloch - Creating configuration files
Installing systemd start files, use systemctl
Moloch - Installing /etc/logrotate.d/moloch to rotate files after 7 days
Moloch - Installing /etc/security/limits.d/99-moloch.conf to make core and memlock unlimited
Download GEO files? (yes or no) [yes] <そのままEnter>
|
- 初期化2
  1
  2
|
| /data/moloch/db/db.pl http://localhost:9200 init
/data/moloch/bin/moloch_add_user.sh <ユーザー名(e.g. admin)> "<表示上のユーザー名>" "<パスワード>" --admin
|
- Moloch設定
vi /data/moloch/etc/config.ini
  1
  2
3
4
5
|
-
|
!
| pcapDir = /mnt/usb/moloch/raw
freeSpaceG = 10%
|
- 追加設定, 再起動
  1
  2
  3
  4
  5
6
7
|
| mkdir -p /mnt/usb/moloch/raw
chown nobody:root /mnt/usb/moloch/raw
chmod 777 /mnt/usb/moloch/raw/
systemctl restart molochcapture
systemctl restart molochviewer
systemctl enable molochcapture
systemctl enable molochviewer
|
- vi /etc/crontab
  1
  2
| -
!
| 25 7 * * * root /data/moloch/db/db.pl 127.0.0.1:9200 expire daily <保持日数>
|
- アクセス
http://<固定IP>:8005
検証時の環境 †
- GS105E-200JPS
- LIVA Z-4
- Ubuntu 18.04 LTS
- moloch 1.8.0-1
- elasticsearh 6.8.2
- openjdk-8-jdk 8u222-b10-1ubuntu1~18.04.1
参考 †


