Last-modified: 2017-04-05 (水) 04:30:36
概要 †
Zabbix serverをRaspberry piに入れ、agentをRaspberry piとWindowsにインストールします。
Zabbix serverを入れるRaspberry piは、ほぼ専用用途で作成するので、全てパッケージ構成で作成します。
(MySQL, Apache, PHPなどは未インストール状態で、MariaDB, Nginx, HHVMなどに置き換えたりはしません)
なお、このZabbix serverへのLAN外からのアクセスは、VPN経由でしかできないという想定の下構築しています。
主に実現することは、以下の通りです。
- メール通知
- ホストの自動登録
- 監視端末のリソース状況俯瞰
- microSD, USBメモリのI/O取得とグラフ化(標準のテンプレートではディスクI/O値は取得しないので)
- 監視端末のログ収集
Zabbix serverのインストール †
- インストール
  1
  2
  3
  4
  5
  6
  7
  8
  9
 10
 11
 12
 13
 14
-
!
-
!
-
!
# インストール apt-get install zabbix-server-mysql zabbix-frontend-php zabbix-agent php5-mysql fonts-ipafont # ウィザードで、MySQLのrootパスワードを設定 # DB作成 mysql -uroot -p create database zabbix character set utf8 collate utf8_bin; grant all privileges on zabbix.* to zabbix@localhost identified by '<パスワード>'; exit cd /usr/share/zabbix-server-mysql zcat schema.sql.gz | mysql -v -uzabbix -p zabbix zcat images.sql.gz | mysql -v -uzabbix -p zabbix zcat data.sql.gz | mysql -v -uzabbix -p zabbix - 設定変更
vi /etc/zabbix/zabbix_server.confvi /usr/share/zabbix/include/defines.inc.php1 2
DBHost=localhost DBPassword=<zabbix@localhostのパスワード>vi /etc/php5/apache2/php.ini1 2
define('ZBX_FONTPATH', '/usr/share/fonts/opentype/ipafont-gothic/'); define('ZBX_GRAPH_FONT_NAME', 'ipagp');vi /etc/mysql/my.cnf1 2 3 4
post_max_size = 16M max_execution_time = 300 max_input_time = 300 date.timezone = Asia/Tokyo1 2 3 4 5 6 7 8 9 10 11 12 13 14 15 16 17 18 19 20 21 22- | | | | | | | | | | | | | !
# Zabbix server専有のRaspberry pi3向けの設定例 # my.cnfのチューニングは必須ではない # # innodb_flush_log_at_trx_commit=0は、ログファイルへの書き込み及びディスク同期を1秒毎に行う設定 # よって、MySQLプロセスがクラッシュすると最大1秒分のデータが消える # その分、頻繁にcommitする場合はパフォーマンスが上がる # innodb_flush_log_at_trx_commit=1がデフォルト値 # この場合は、ログファイルへ書き込み及びディスク同期をcommit時に行う # # 最大1秒のデータ損失リスクは受容した # また、Raspberry Pi(microSD)に書き込んでいるので、commit毎にディスク同期されたら劣化が早まりそう(推測の域を出ないが) # ちなみに、MySQLのデータファイルだけ、microSDよりベンチマークスコアは良いUSBメモリに移動してみたが # それまで発生しなかったio waitが発生し、WebGUIのレスポンスも体感でわかるほど劣化したので戻した # USB接続の2.5インチHDDが手堅いが、バックアップ体制も完全なので、どのくらいで壊れるのか様子を見ることにする [mysqld] innodb_buffer_pool_size=512M innodb_log_file_size=128M innodb_flush_log_at_trx_commit=0 tmp_table_size=32M max_heap_table_size=32M query_cache_size=128M query_cache_limit=4M - サイト有効化
  1
  2
ln -s /usr/share/doc/zabbix-frontend-php/examples/apache.conf /etc/apache2/conf-available/zabbix.conf a2enconf zabbix - ログファイルサイズの変更
上記の通り、MySQLのログファイルサイズを変更しないのであればこの作業は不要1 2 3 4 5 6 7 8 9 10
service apache2 stop service zabbix-server stop mysql -uroot -p SET GLOBAL innodb_fast_shutdown=0; exit service mysql stop rm /var/lib/mysql/ib_logfile* service mysql start - 再起動
  1
  2
service zabbix-server retart service apache2 restart - iptables設定
いつもどおりの構成ならば(iptables/Debianへのインストール)
vi /etc/network/if-pre-up.d/iptables1 2 3
iptables -A INPUT -p tcp --dport 80 -m state --state NEW -j ACCEPT # HTTP iptables -A INPUT -p tcp --dport 10051 -m state --state NEW -j ACCEPT # Zabbix iptables -A INPUT -p udp --dport 10051 -m state --state NEW -j ACCEPT # Zabbix - 設定変更2
ブラウザで、http://<IP>/zabbix へアクセス
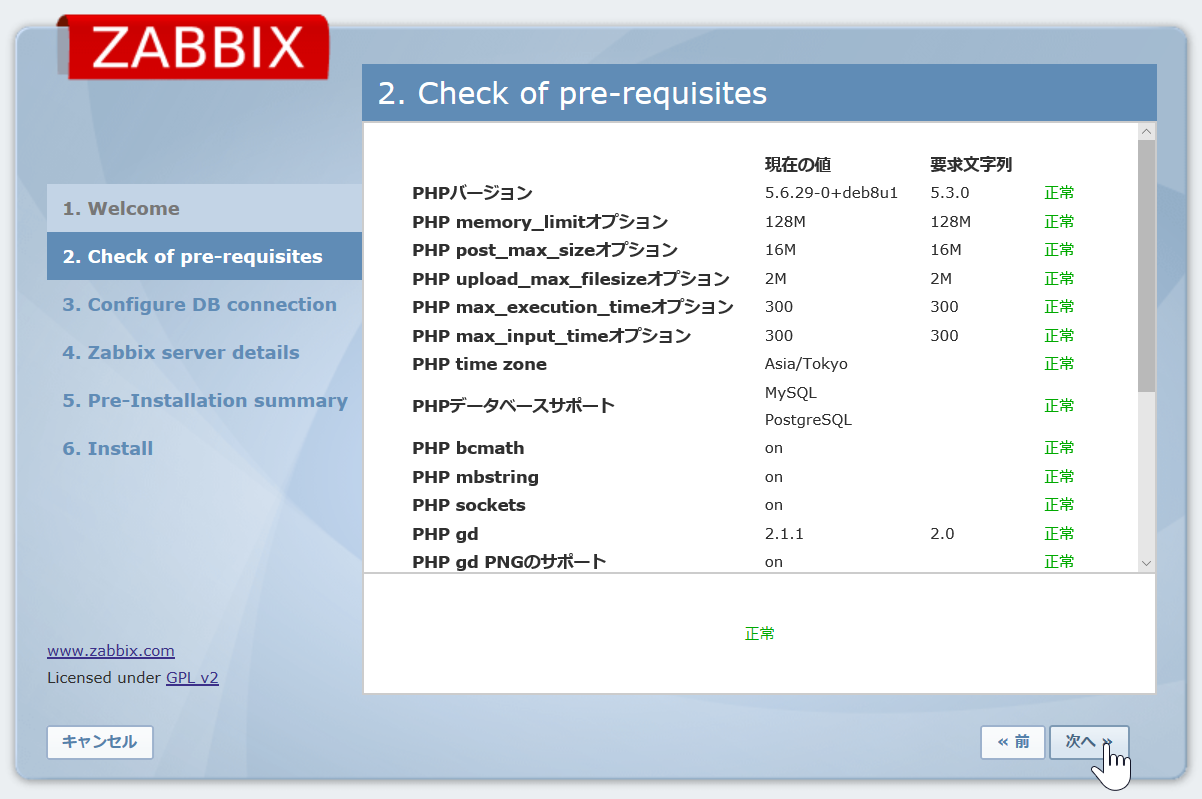
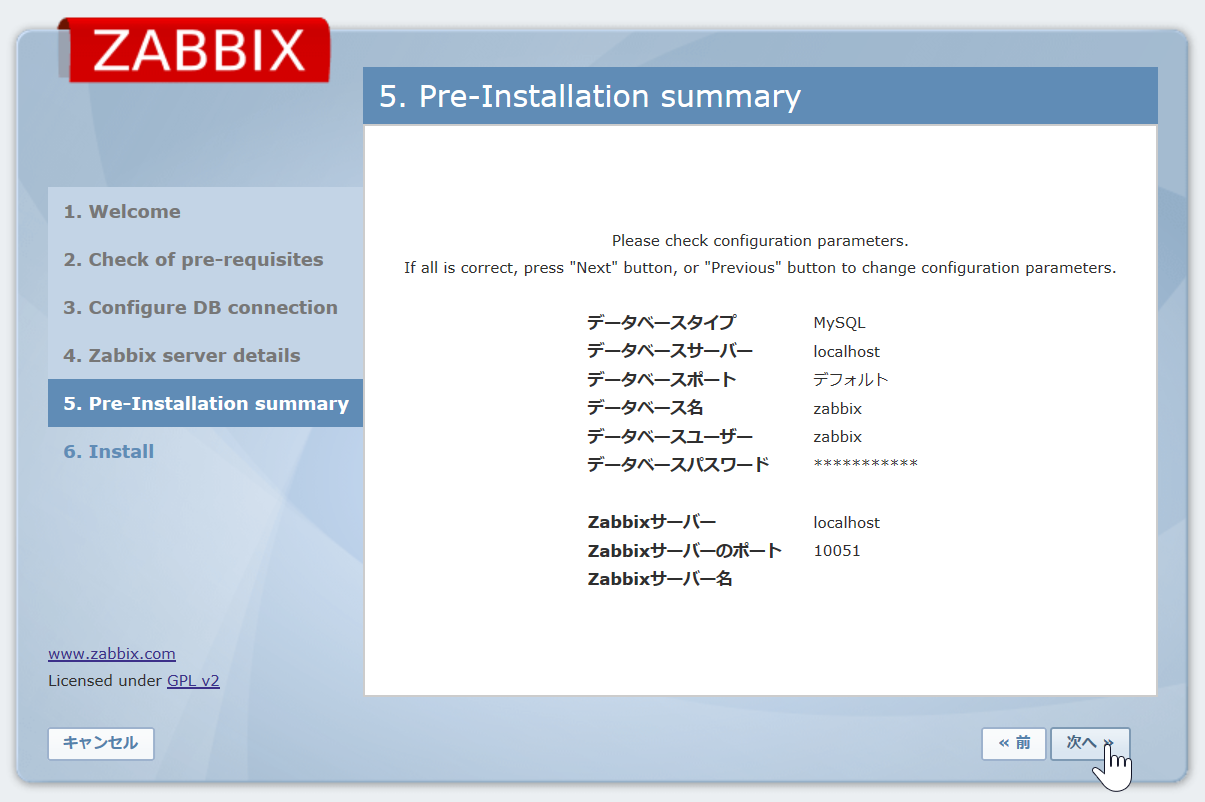
PHPの設定が正常であることを確認 MySQLの接続設定を行い、zabbix.conf.phpをダウンロード vi /etc/zabbix/zabbix.conf.php
e.g.vi /etc/default/zabbix1 2 3 4 5 6 7 8 9 10 11 12 13 14 15 16 17 18 19
<?php // Zabbix GUI configuration file global $DB; $DB['TYPE'] = 'MYSQL'; $DB['SERVER'] = 'localhost'; $DB['PORT'] = '0'; $DB['DATABASE'] = 'zabbix'; $DB['USER'] = 'zabbix'; $DB['PASSWORD'] = '<パスワード>'; // SCHEMA is relevant only for IBM_DB2 database $DB['SCHEMA'] = ''; $ZBX_SERVER = 'localhost'; $ZBX_SERVER_PORT = '10051'; $ZBX_SERVER_NAME = ''; $IMAGE_FORMAT_DEFAULT = IMAGE_FORMAT_PNG; ?>1
START=yes - 再起動
1 2
service zabbix-server restart service apache2 restart
初期設定 †
ブラウザで、http://<IP>/zabbix へアクセス
Admin/zabbix でログイン
言語(日本語) †
- [Profile]-[Language]-<Japanese(ja_JP)>-[Save]
新規管理者ユーザー作成, Admin削除 †
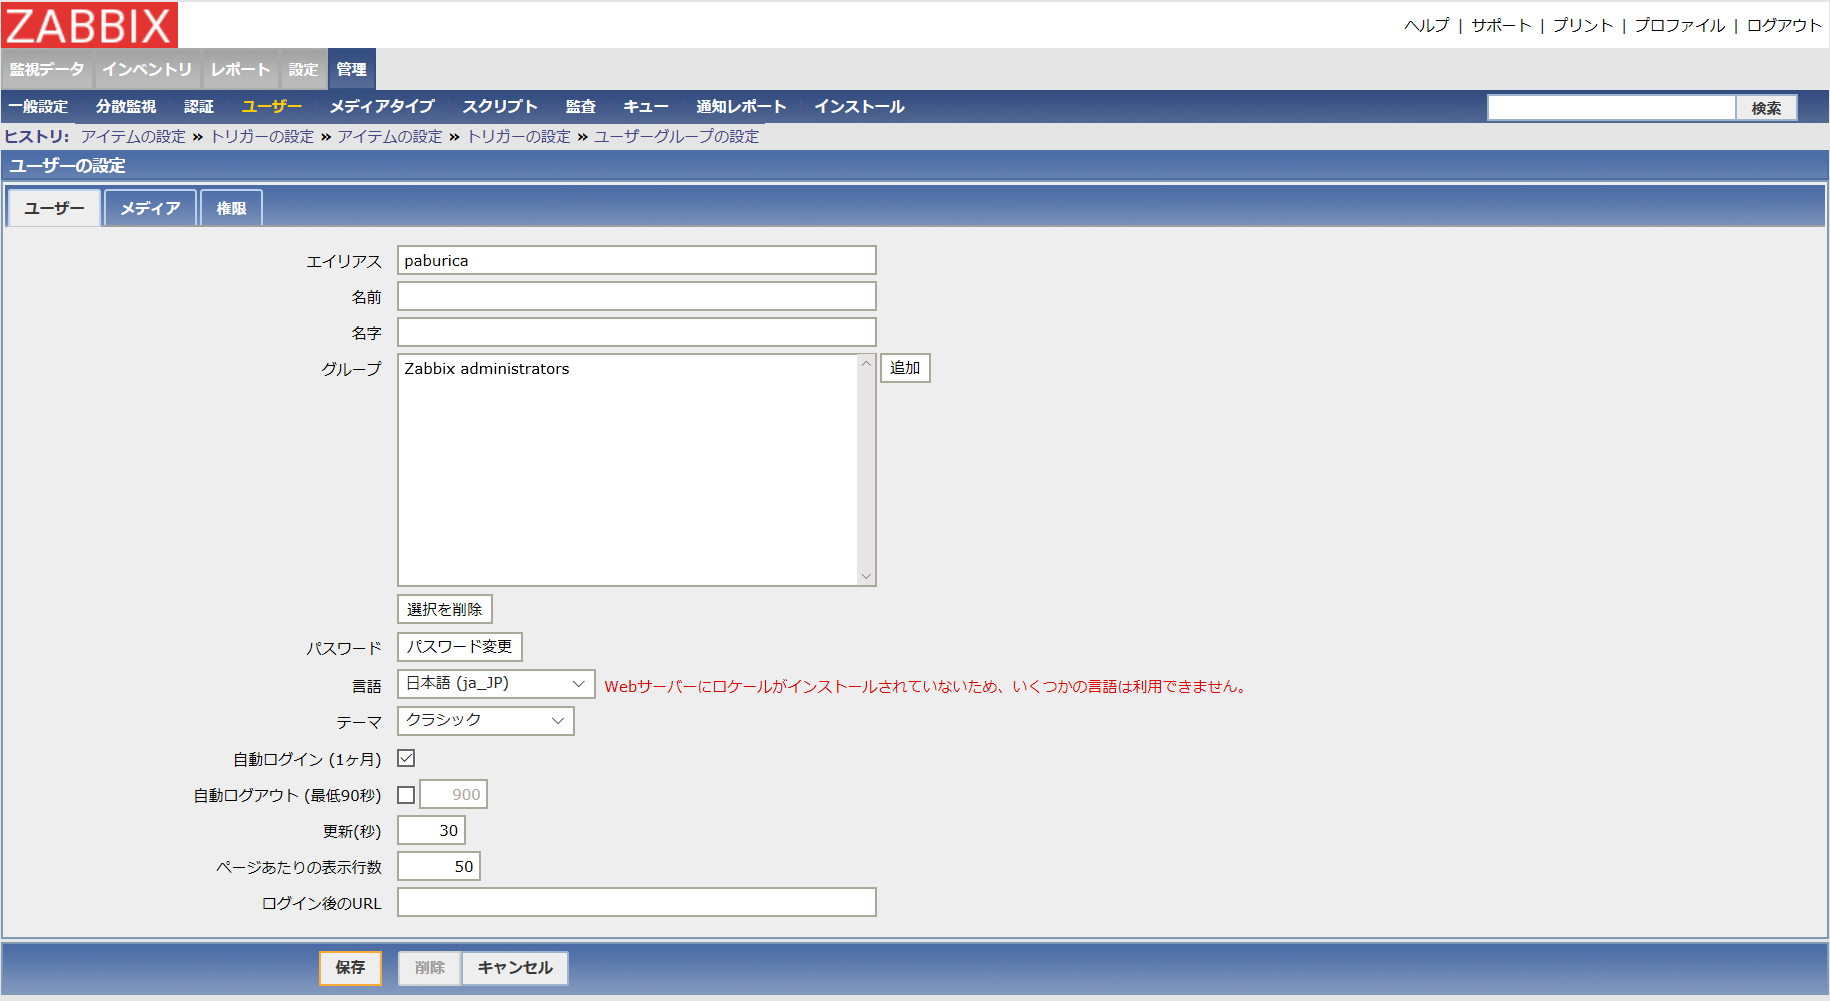
- [管理]-[ユーザー]-(右上ドロップダウン)[ユーザー]-[ユーザーの作成]
[ユーザー]タブ
グループ:Zabbix administrators
言語:日本語(ja_JP)
[権限]タブ
ユーザーの種類:Zabbix特権管理者
あとは好みで設定し[保存] - 今作成したユーザーで入り直し、[管理]-[ユーザー]-(右上ドロップダウン)[ユーザー]でAdminを選択し、[削除]
データの保存期間 †
[管理]-[一般設定]-(右上ドロップダウン)[データの保存期間]
必要に応じて調整する
メール通知 †
メールの送信はいつも通りの構成(Exim4/外部SMTPサーバー経由でメールを送信したい(Debian))
- [管理]-[メディアタイプの作成]
1 2 3- | |
# 名前:メール送信 # タイプ:スクリプト # スクリプト名:alertmail.sh - vi /etc/zabbix/alert.d/alertmail.sh
1 2 3 4 5 6 7 8 9- !
#!/bin/bash to=$1 subject=$2 body=$3 cat <<EOF | mail -s "$subject" "$to" $body EOF1
chmod 755 /etc/zabbix/alert.d/alertmail.sh - [管理]-[ユーザー]-<メールを送信したいユーザー>-[メディア]-[追加]
1 2 3 4- | | |
# [メディア]タブ # タイプ:メール送信 # 送信先:<メールアドレス> # 指定した深刻度の時に使用:軽度, 重度, 致命的な障害 - [設定]-[アクション]-(右上ドロップダウン)[イベントソース]-[トリガー]-[アクションの作成]
1 2 3 4 5 6 7- | | | | | |
# [アクション]タブ # 名前:障害メール通知 # リカバリメッセージ:ON # [アクションの実行内容] # 実行内容のタイプ:メッセージの送信 # ユーザーに送信:<任意のユーザー名> # 次のメディアのみ使用:メール送信(先ほど作成したメディア名)
ディスクI/O取得 †
- [設定]-[テンプレート]-[テンプレートの作成]
1 2 3- | |
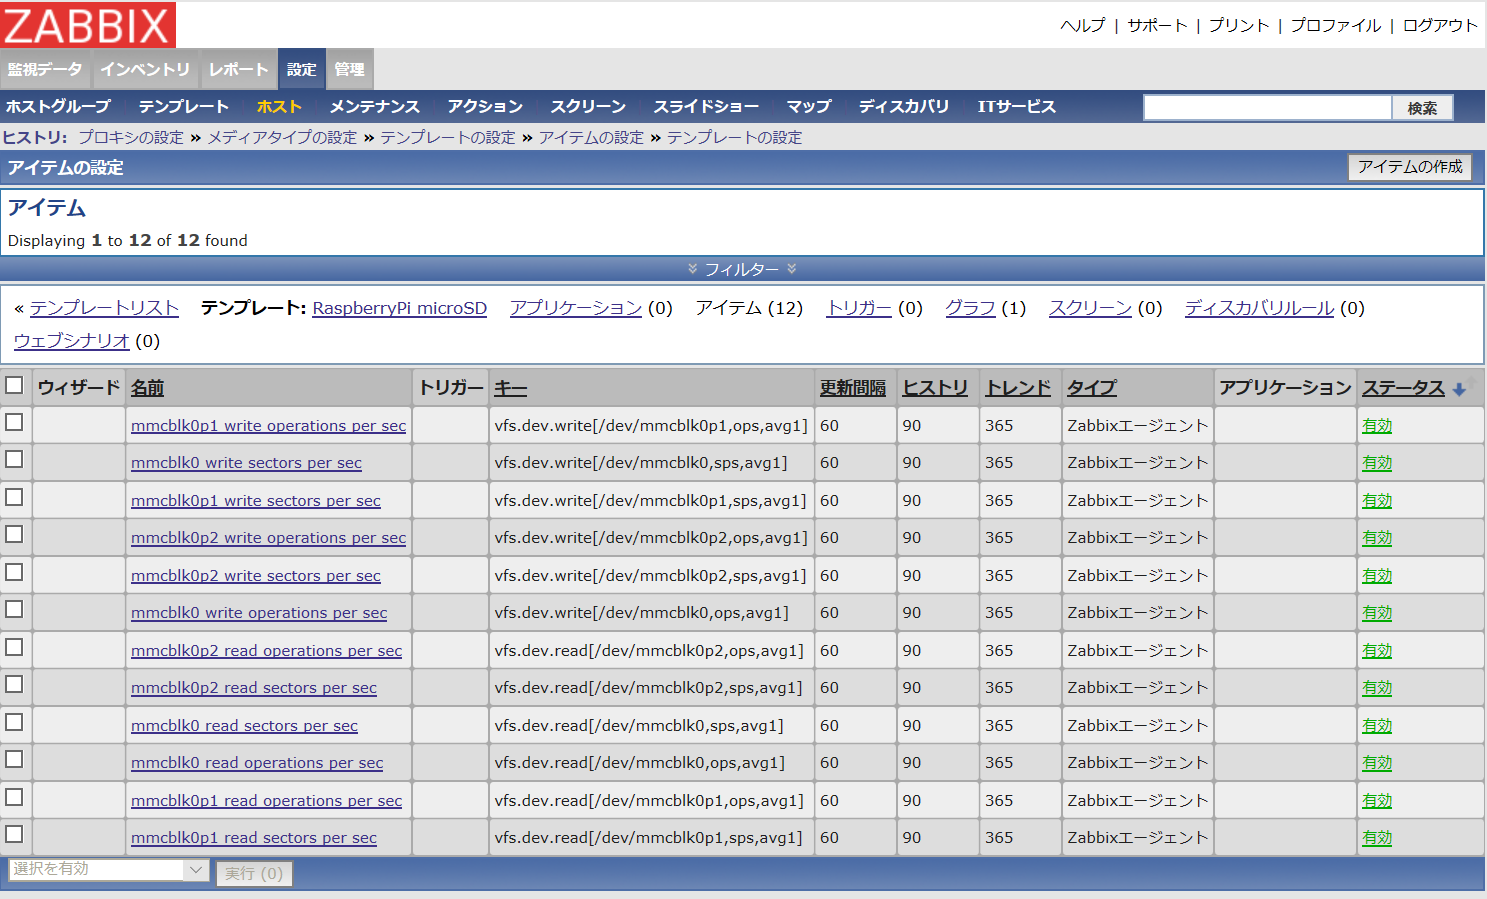
# [テンプレート]タブ # テンプレート名:RaspberryPi microSD # グループ:Linux servers - [RaspberryPi microSD]-[アイテム]-[アイテムの作成]
これをmmcblk0, mmcblk0p1, mmcblk0p2, read, write, ops, spsの組み合わせ分定義する
1 2 3 4 5 6- | | | | |
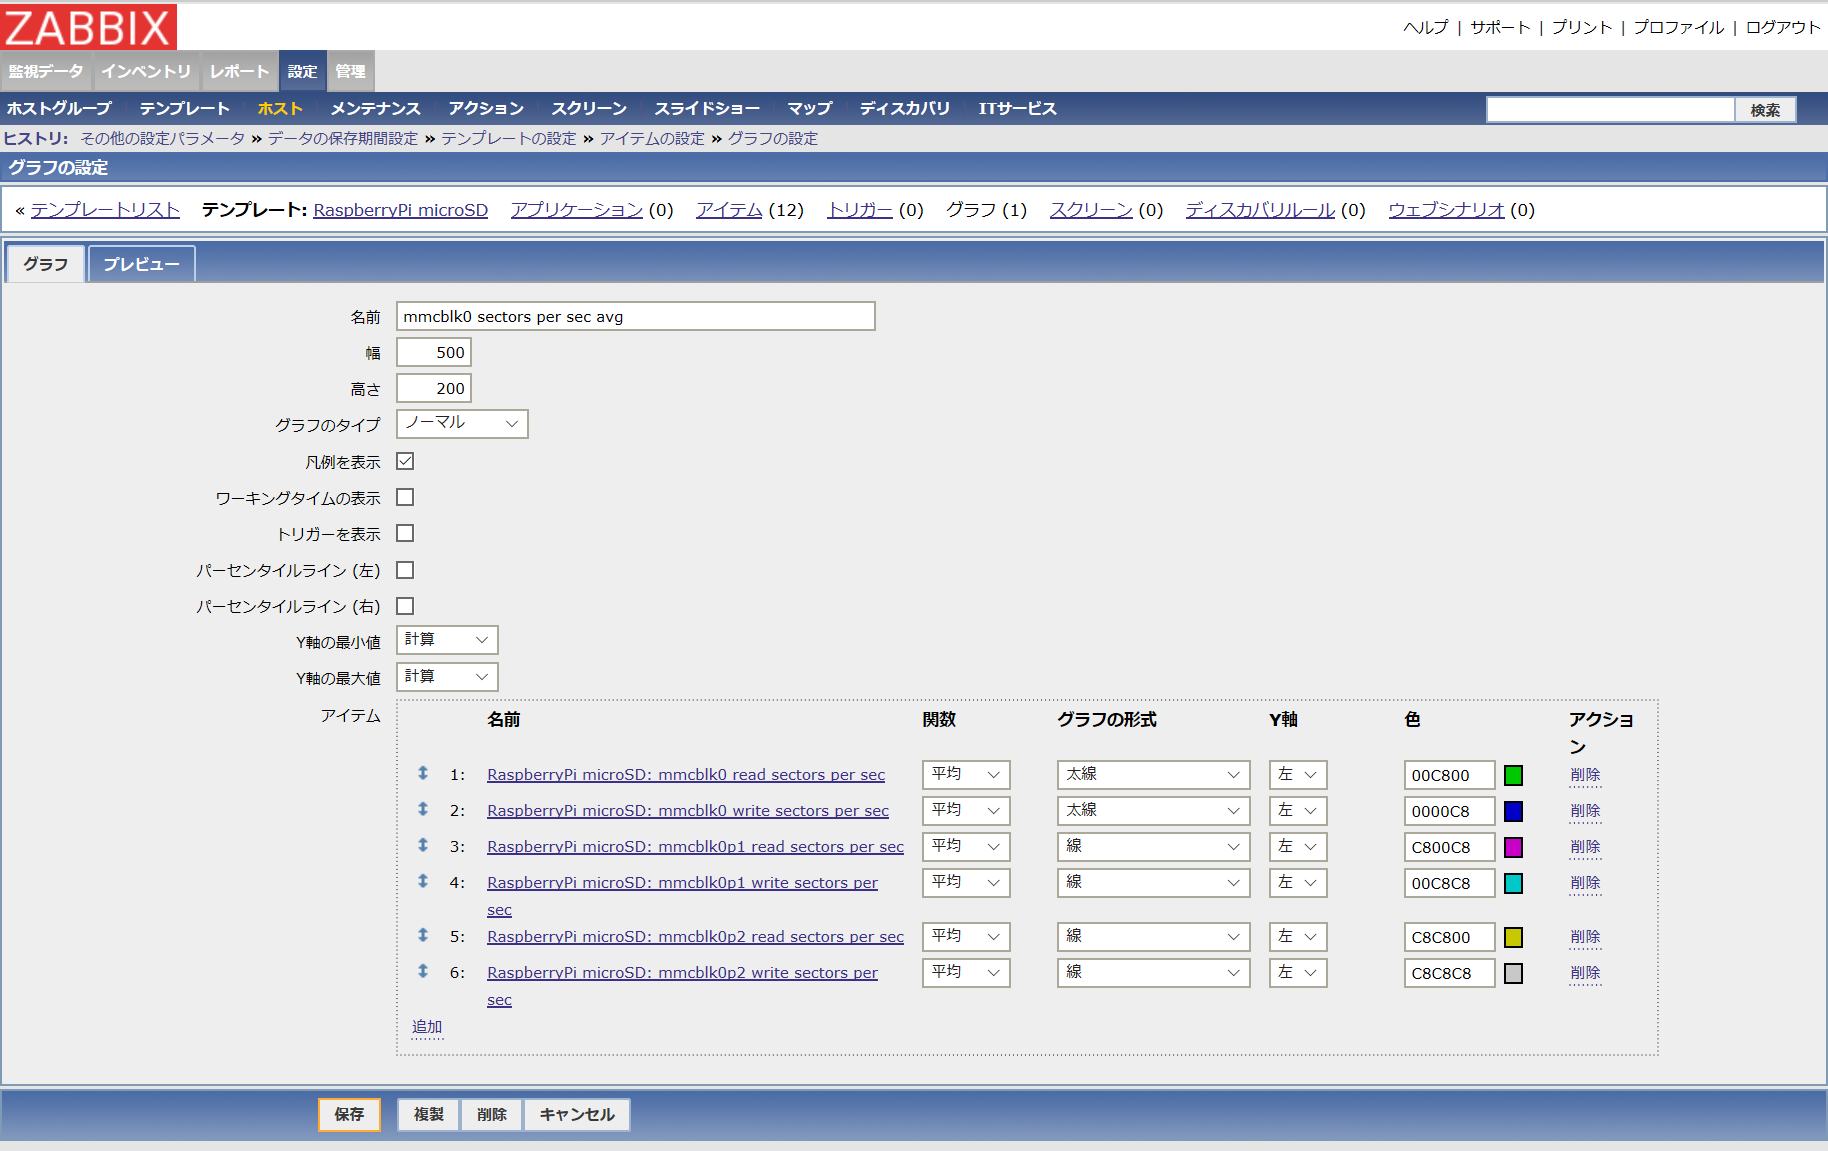
# 名前:mmcblk0 write operations per sec # タイプ:Zabbix エージェント # キー:vfs.dev.write[/dev/mmcblk0,ops,avg1] # データ型:数値(浮動小数) # 単位:ops # 更新間隔(秒):60 - [RaspberryPi microSD]-[グラフ]-[グラフの作成]
ほかのディスクもあり、監視したいのであれば、同じようなことを繰り返す
1 2 3 4- | | |
# 名前:mmcblk0 sectors per sec avg # 幅:500 # 高さ:200 # アイテム:mmcblk0(sps,read/write)太線, mmcblk0p1(sps,read/write)線, mmcblk0p2(sps,read/write)線
ホストの自動登録 †
- [設定]-[アクション]-(右上ドロップダウン)[自動登録]-[アクションの追加]
これをLinux, Windows, Mac用にも定義する
1 2 3 4 5 6- | | | | |
# [アクション]タブ # アクション名:Raspberry Piホストの自動登録 # [アクションの実行条件]タブ # 新規条件:ホストメタデータにPiを含む (主張のない[追加]クリックを忘れないこと zabbix 2.2GUIの残念なUIの特徴) # [アクションの実行内容]タブ # 実行内容のタイプ:ホストを追加, テンプレートとのリンクを作成(Template OS Linux, RaspberryPi microSD)
監視対象のログ収集 †
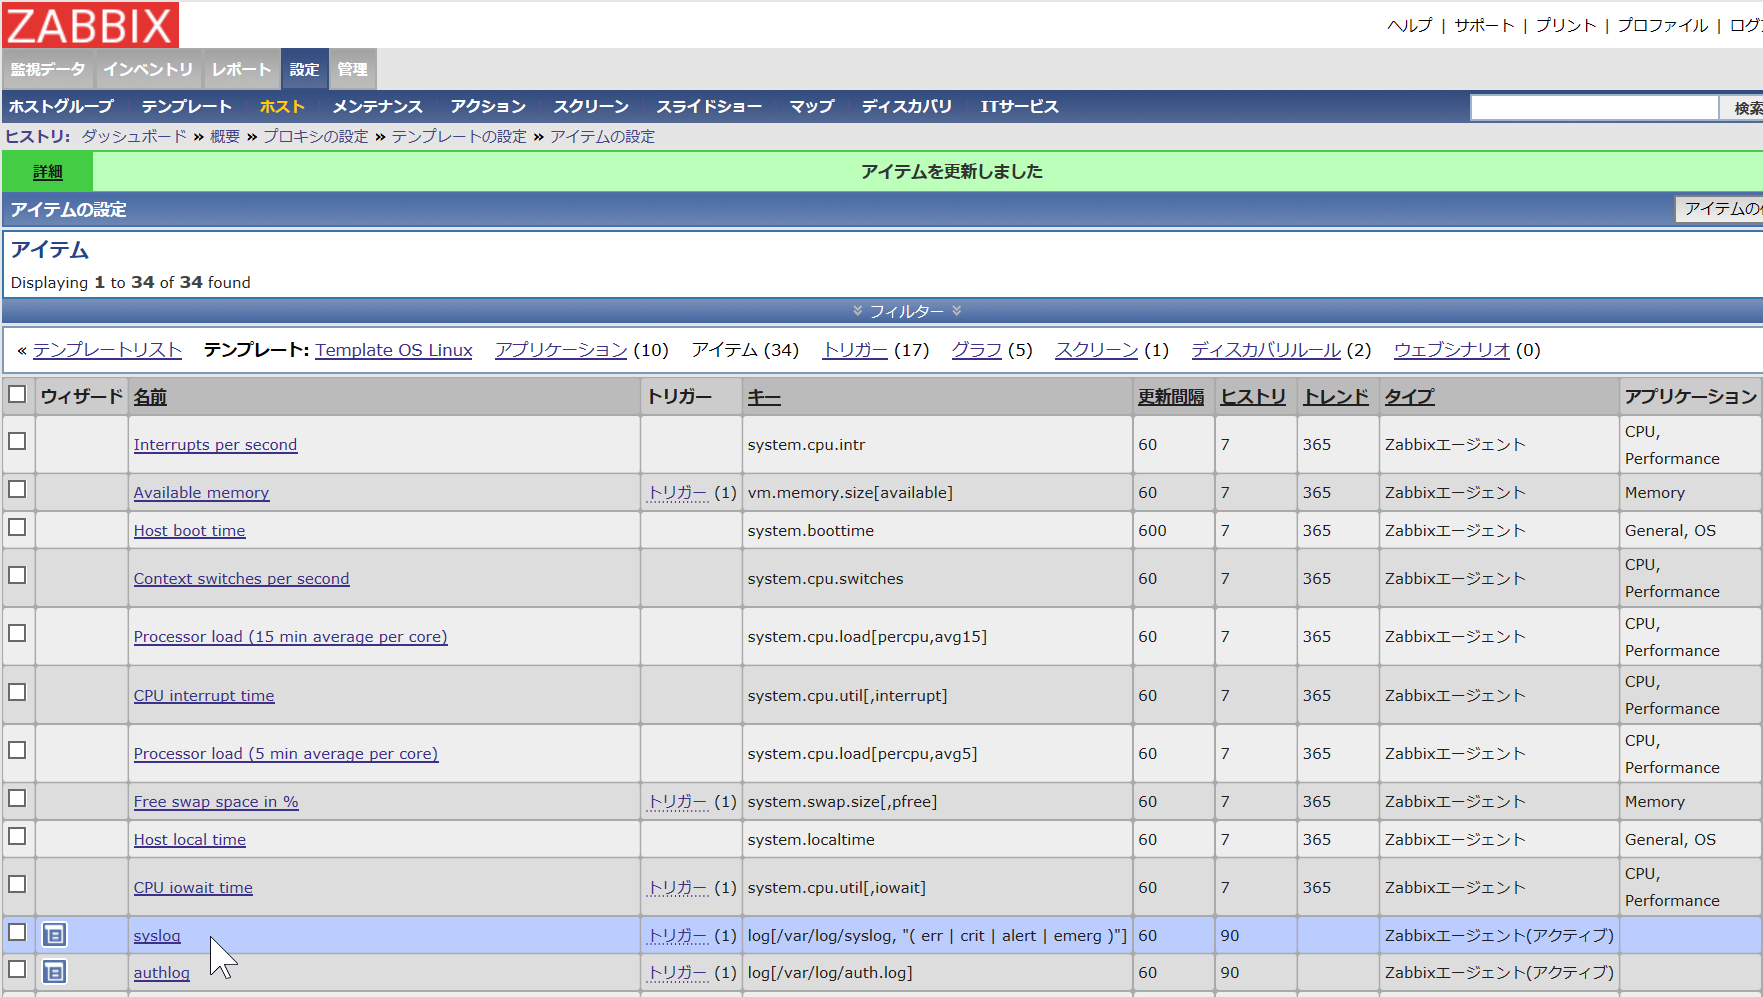
syslogはプライオリティがerr以上を、auth.logは全て収集
- [設定]-[テンプレート]-[Template OS Linux]-[アイテム]-[アイテムの作成]
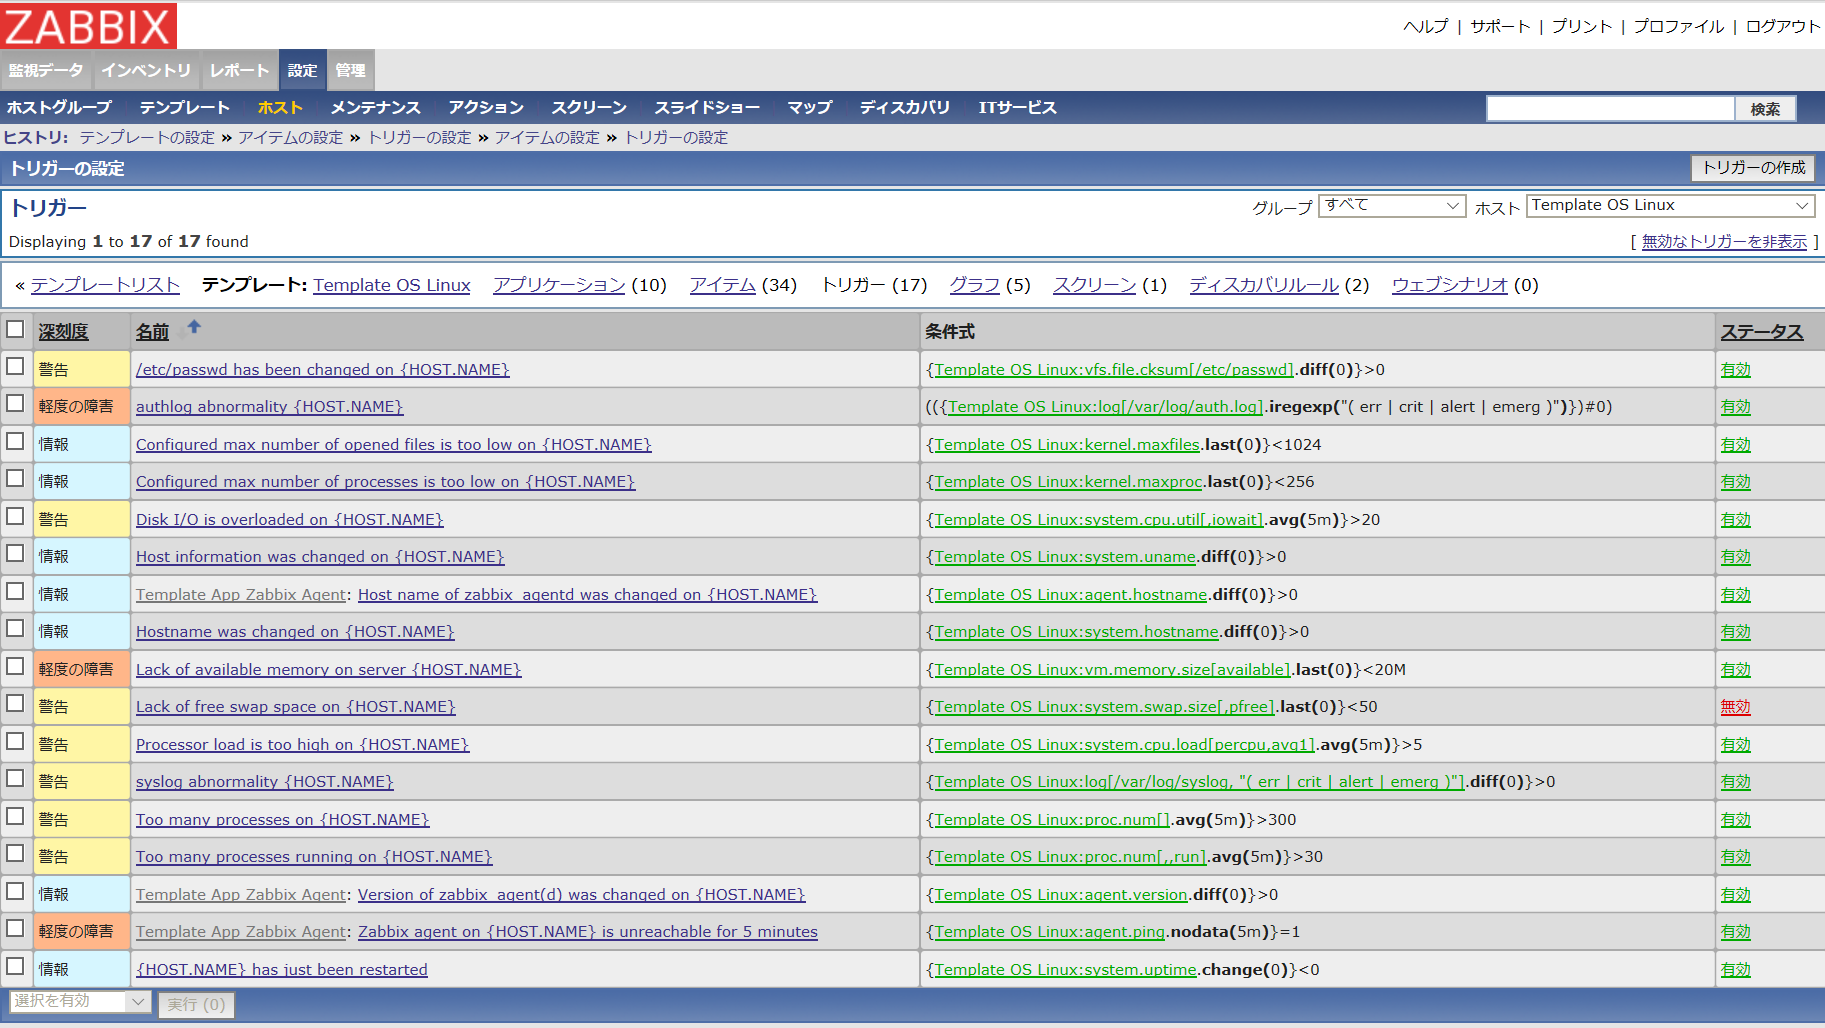
- [設定]-[テンプレート]-[Template OS Linux]-[トリガー]-[トリガーの作成]
1 2 3 4 5 6 7 8 9
- | | | ! - | | |
# 説明:syslog abnormality {HOST.NAME} # 条件式:{Template OS Linux:log[/var/log/syslog, "( err | crit | alert | emerg )"].diff(0)}>0 # 障害イベントを継続して生成:OFF # 深刻度:軽度の障害 # 説明:authlog abnormality {HOST.NAME} # 条件式:(({Template OS Linux:log[/var/log/auth.log].iregexp("( err | crit | alert | emerg )")})#0) # 障害イベントを継続して生成:OFF # 深刻度:軽度の障害 - agent側の設定
syslog(-rw-r----- 1 root adm)なので、zabbix-agentが動作しているユーザー(zabbix)ではアクセスできない
admは、監視システムなど用のログが見れるグループなので、zabbixユーザーの補助グループにadmを追加プライオリティ情報をトリガーの条件としたが、デフォルトのrsyslog設定では、プライオリティはログに出力されていない1
usermod -aG adm zabbix
プライオリティを出力するようにする
vi /etc/rsyslog.conf1 2 3 4 5 6 7 8 9 10
- | | ! - | | !
############### #### RULES #### ############### $template logformat, "%timegenerated% %hostname% %programname% %syslogpriority-text% %msg%\n" # # First some standard log files. Log by facility. # auth,authpriv.* /var/log/auth.log;logformat *.*;auth,authpriv.none -/var/log/syslog;logformat - 再起動
1 2
service rsyslog restart service zabbix-agent restart
swapトリガーの無効化 †
Raspberry Piのswapを無効にすると、このトリガーがエラーを出すので、無効にする
- [設定]-[テンプレート]-[Template OS Linux]-[トリガー]
- [Lack of free swap space on {HOST.NAME}]のステータス[有効]をクリックし、[無効]にする
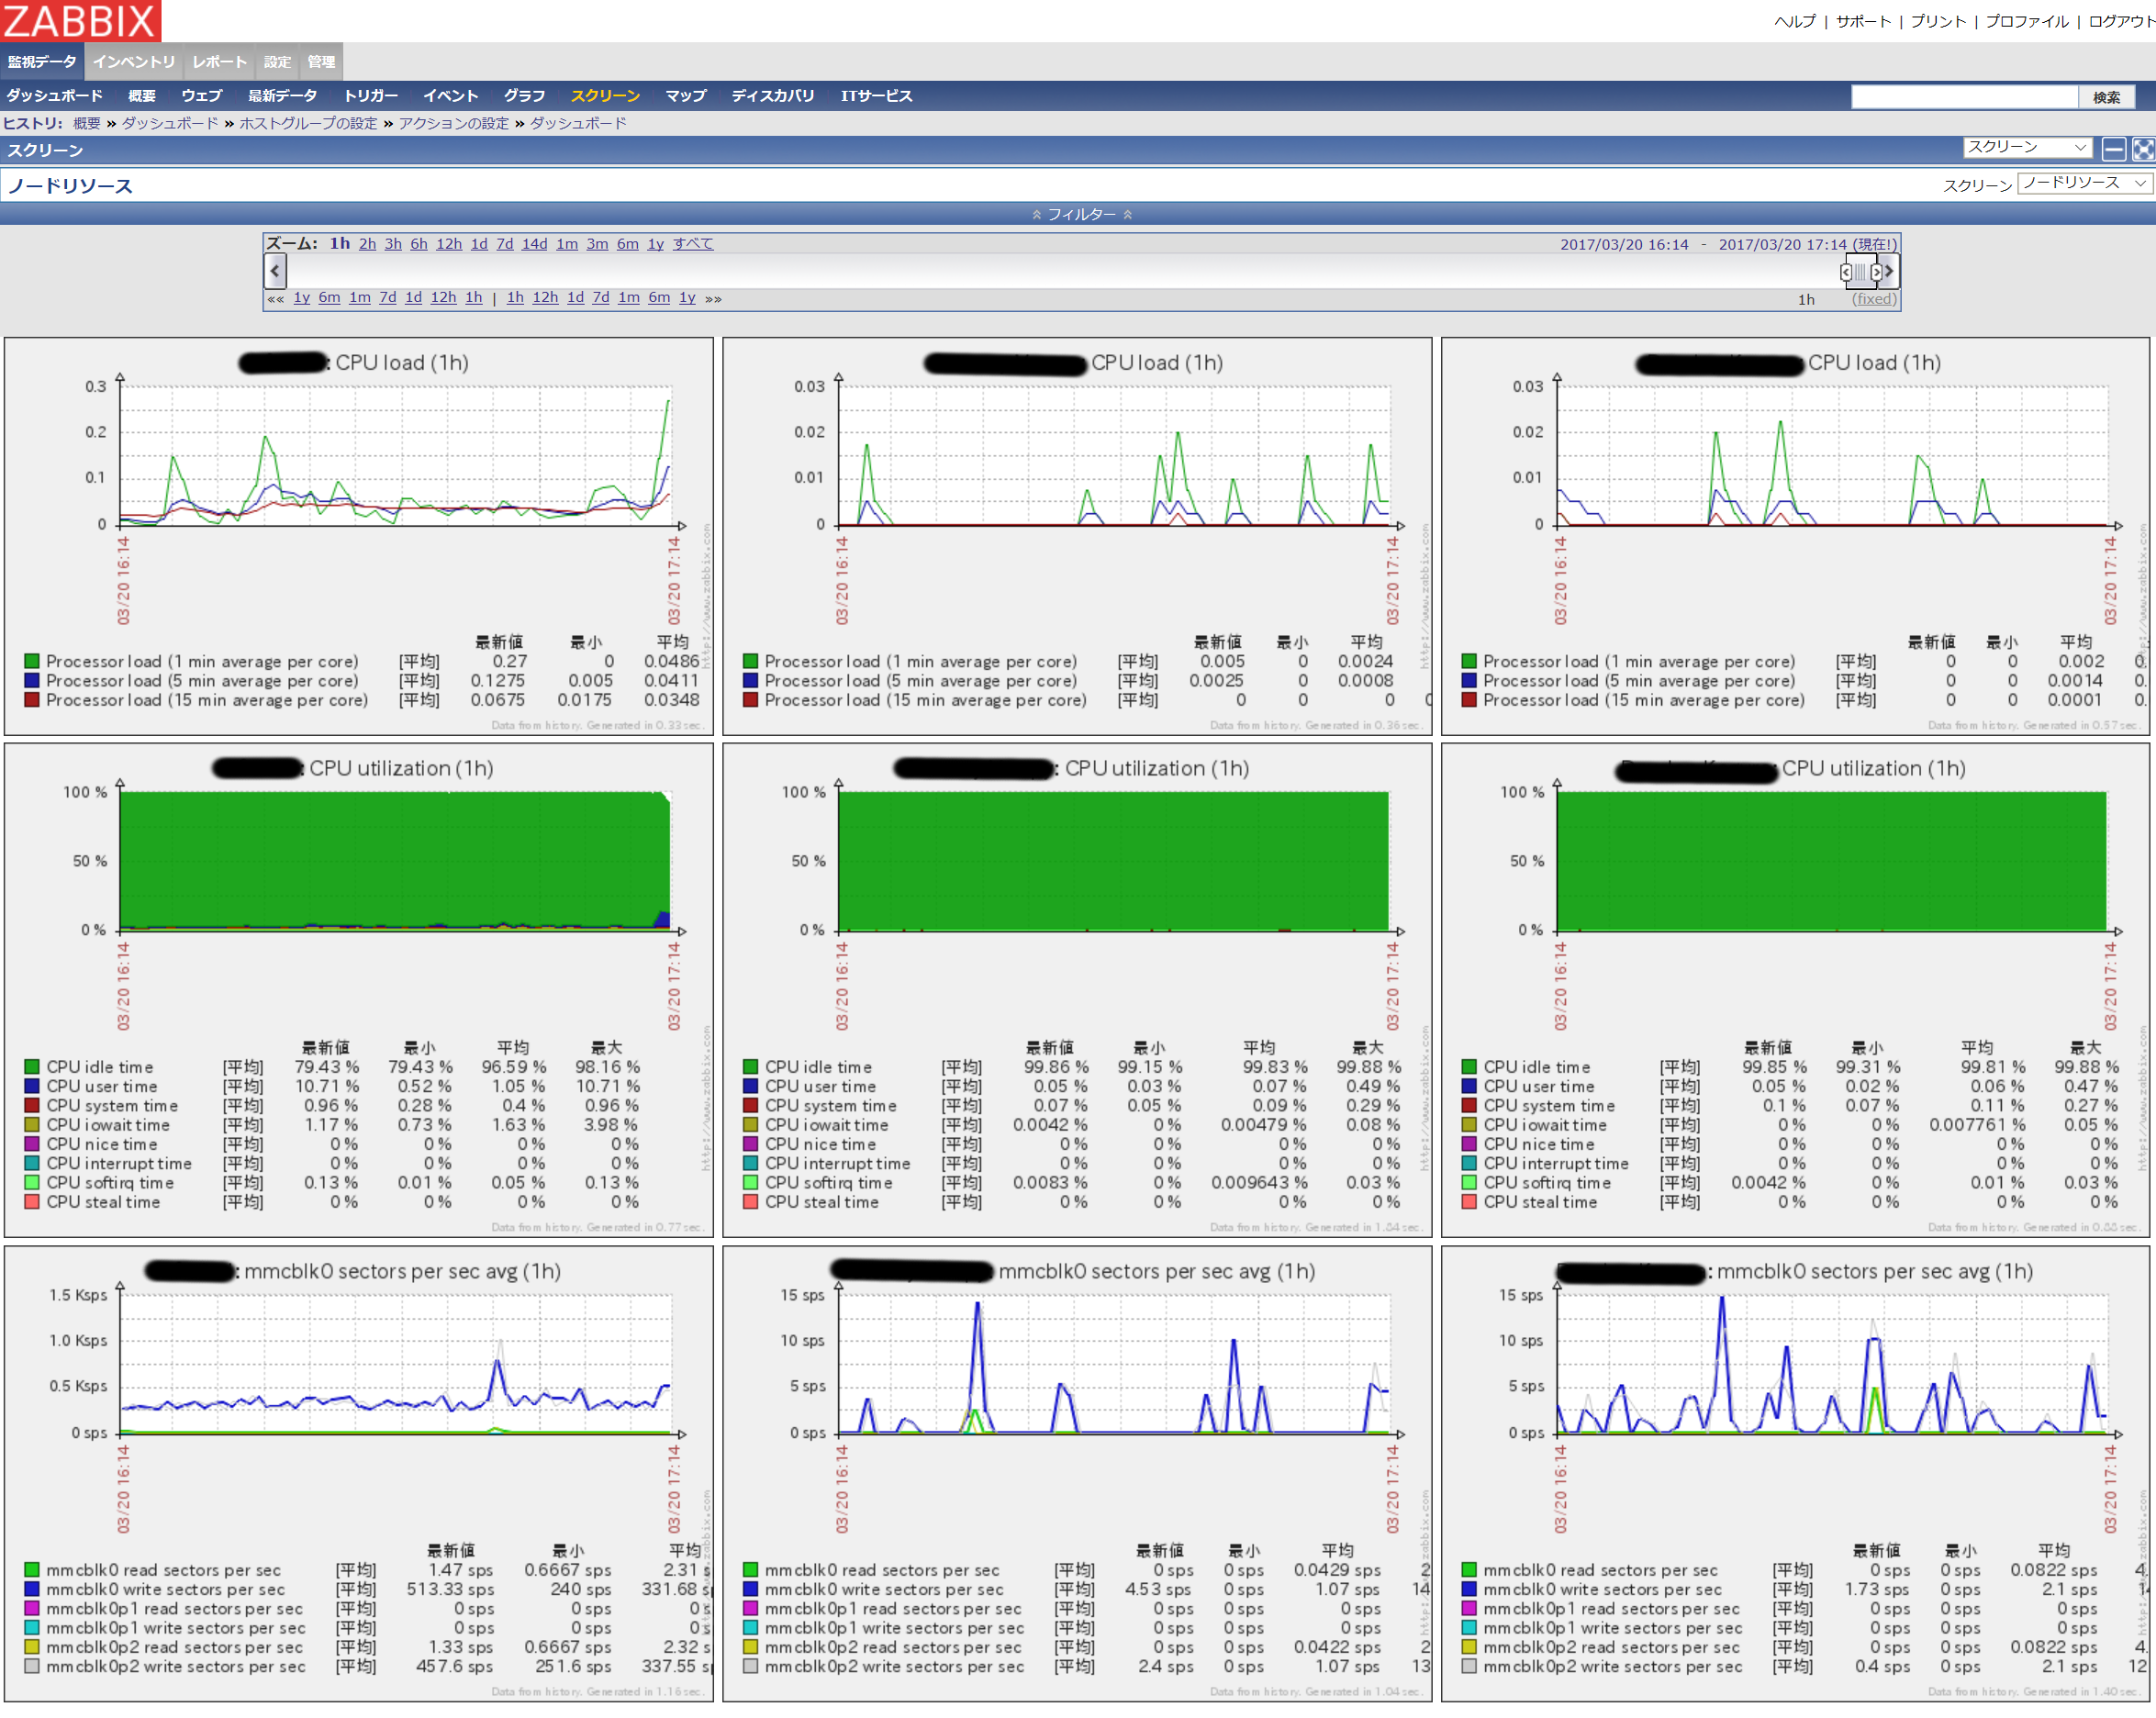
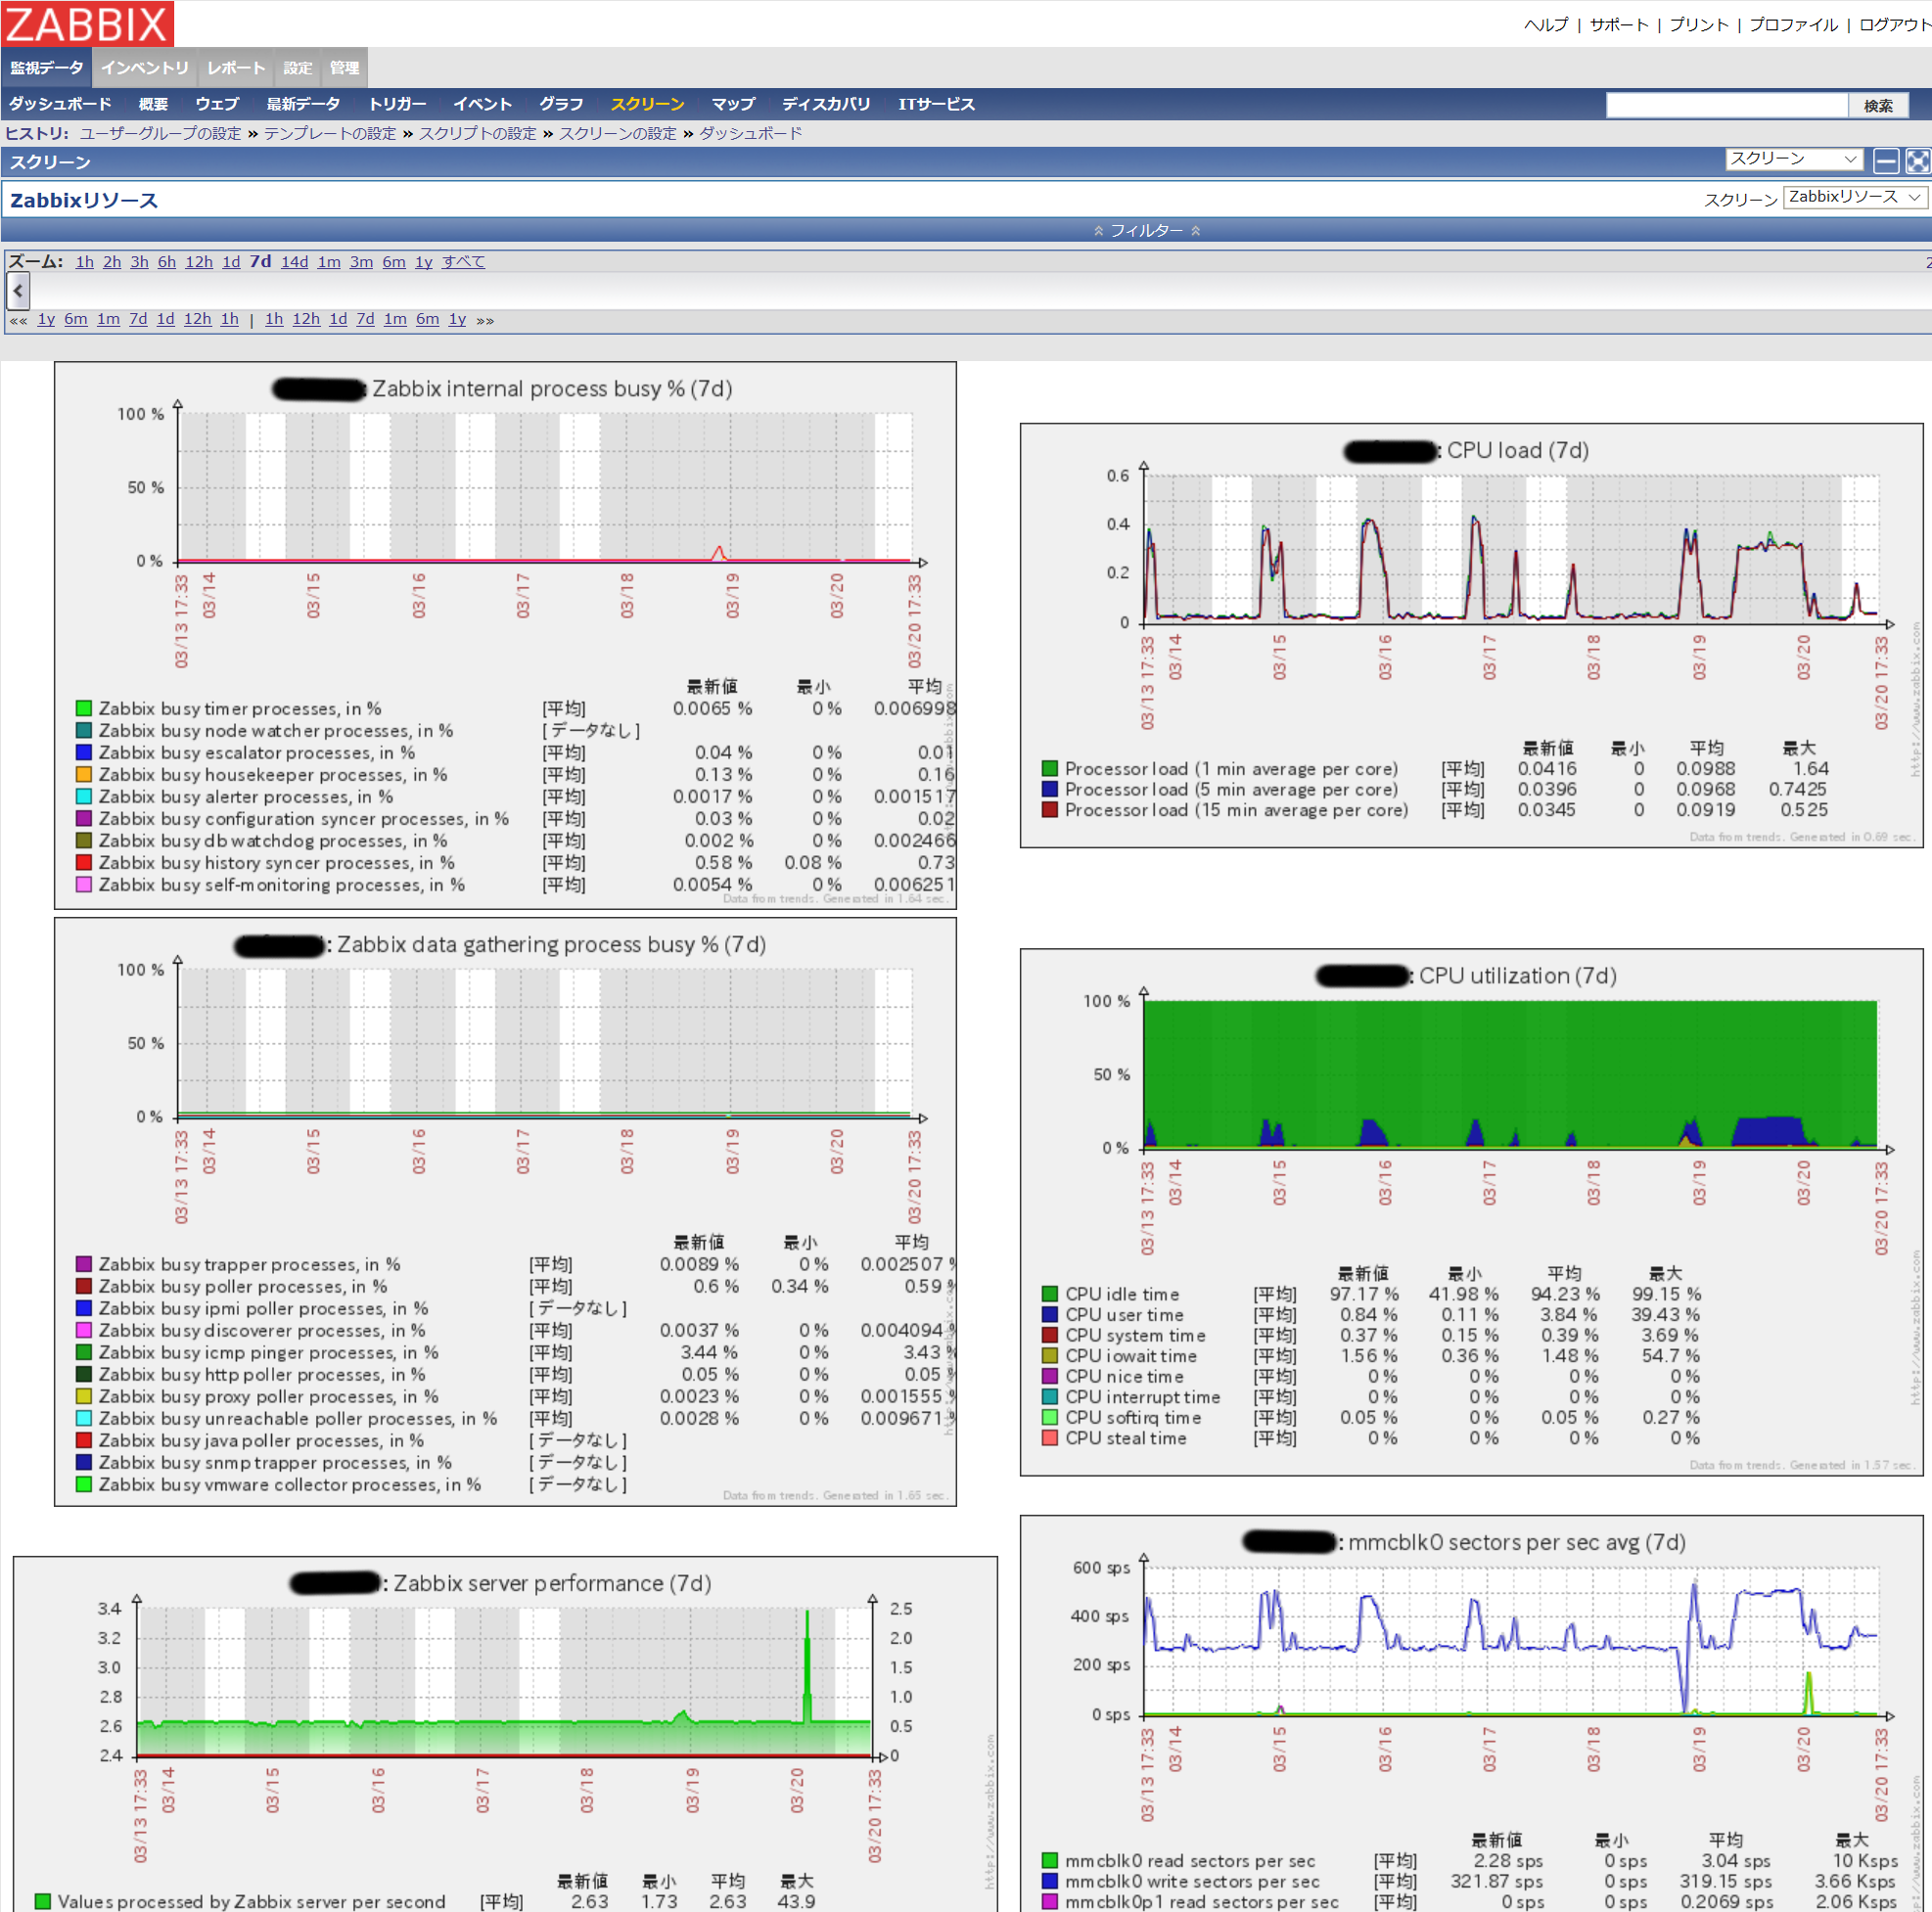
監視端末のリソース状況俯瞰 †
- [設定]-[スクリーン]-[スクリーンの作成]
1 2 3 4 5 6 7 8 9 10 11 12 13 14 15 16
- | | ! - | | | | | | | | | | |
# 名前:ノードリソース # 列:5 # 行:10 # 列は監視ノードなので詳細省略 # 行の詳細(幅は全て400) # グラフ, CPU load # グラフ, CPU utilization # グラフ, mmcblk0 sectors per sec avg # グラフ, sda1 sectors per sec avg # シンプルグラフ, Free disk space on / # シンプルグラフ, Free disk space on /mnt/usb # グラフ, Memory usage # グラフ, Network traffic on eth0 # グラフ, Network traffic on wlan0 # シンプルグラフ, Number of logged in users1 2 3 4 5 6 7 8 9 10 11 12 13 14 15 16 17
- | | ! - | | | | | ! - | | | | |
# 名前:Zabbixリソース # 列:2 # 行:5 # 1行の詳細(幅は全て500) # グラフ, Zabbix internal process busy % # グラフ, Zabbix data gathering process busy % # グラフ, Zabbix server performance # グラフ, Value cache effectiveness # グラフ, Zabbix cache usage, % free # 2行の詳細(幅は全て500) # グラフ, CPU load # グラフ, CPU utilization # グラフ, mmcblk0 sectors per sec avg # グラフ, Memory usage # シンプルグラフ, Free disk space on /
Zabbix agentのインストール †
Linux †
- インストール
1
apt-get install zabbix-agent - vi /etc/zabbix/zabbix_agentd.conf
1 2 3 4
Server=<Zabbix serverの名前|IP> ServerActive=<Zabbix serverの名前|IP> Hostname=<一意な名前> HostMetadata=<Pi or Linux(ホストの自動登録で設定した文字列)> - iptables設定
いつもどおりの構成ならば(iptables/Debianへのインストール)
vi /etc/network/if-pre-up.d/iptables1 2
iptables -A INPUT -p tcp --dport 10050 -m state --state NEW -j ACCEPT # Zabbix agent iptables -A INPUT -p udp --dport 10050 -m state --state NEW -j ACCEPT # Zabbix agent - 再起動
1
service zabbix-agent restart
Windows †
- 公式サイト(http://www.zabbix.com/jp/download)から取得
- 解凍したものを C:\zabbix などに移動
- conf\zabbix_agentd.win.conf を編集
1 2 3 4 5 6
LogFile=C:\zabbix\zabbix_agents_2.2.14.win\bin\win64\zabbix_agentd.log LogFileSize=10 Server=<Zabbix serverの名前|IP> ServerActive=<Zabbix serverの名前|IP> Hostname=<一意な名前> HostMetadata=Windows(ホストの自動登録で設定した文字列) - 管理者権限でcmd
  1
  2
zabbix_agentd -i -c "C:\zabbix\zabbix_agents_2.2.14.win\conf\zabbix_agentd.win.conf" net start "Zabbix agent" - ファイアーウォールの設定で、inbound, 10050(tcp/udp)を開ける
その他 †
phpMyAdmin †
MySQLを使うので、入れておけば便利
  1
  2
  3
4
5
| - ! | |
opcache †
PHPのopcacheが効いているかを確認したければ、以下のphpファイルを、phpmyadminのディレクトリにでも入れておけば便利
https://github.com/rlerdorf/opcache-status/blob/master/opcache.php
serverからagentへの通信確認 †
  1
  2
  3
| - | |
検証時の環境 †
- サーバー
- Raspbian jessie
- Zabbix server 2.2.7
- Raspbian jessie
- エージェント
- Raspbian jessie
- Zabbix agent 2.2.7
- Windows 10 Pro x64
- Zabbix agent 2.2.14
- Raspbian jessie


